What to Know Before Getting a Helix Piercing
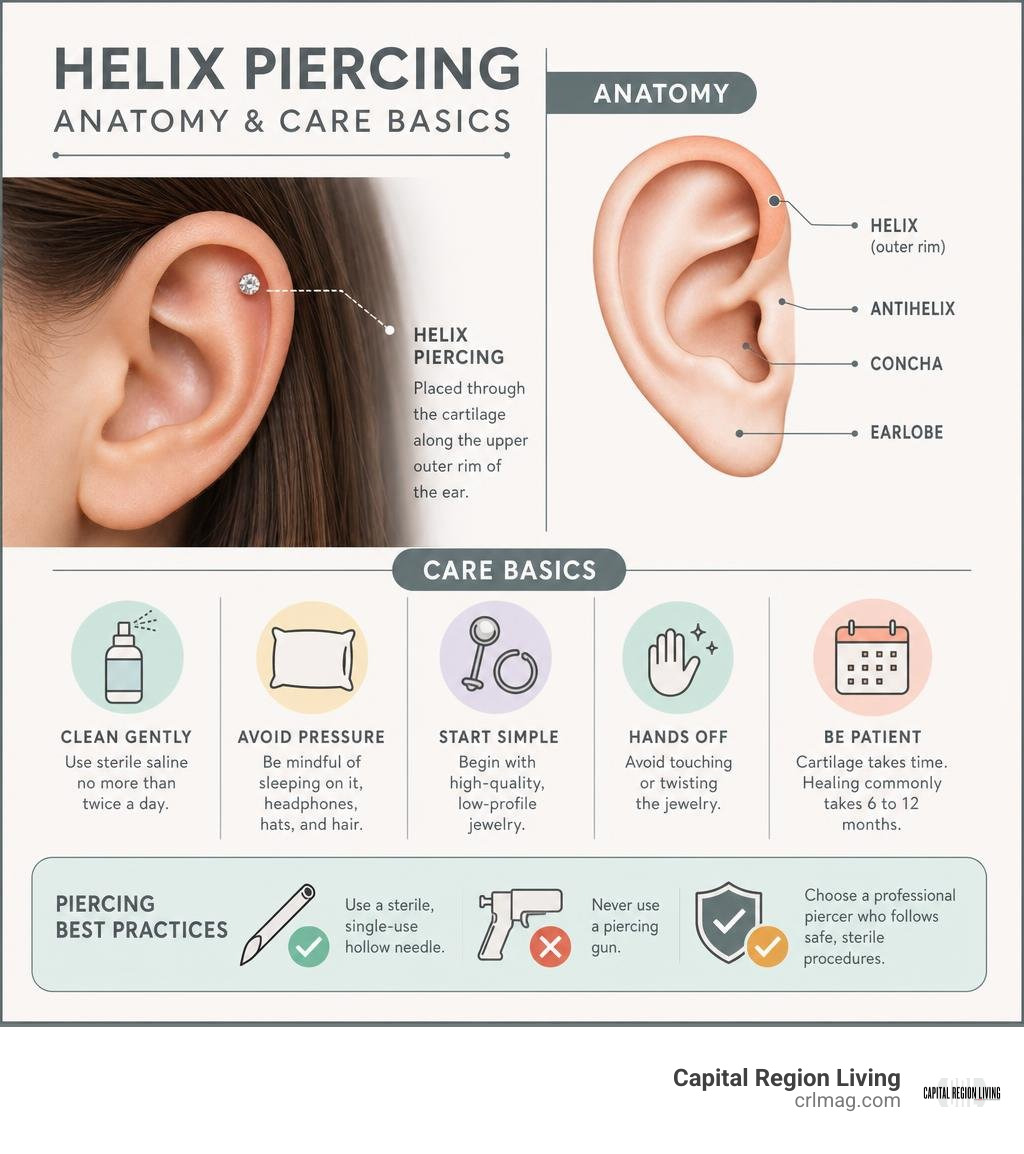
A helix piercing goes through the cartilage along the upper outer rim of the ear. It is a flexible choice for a single stud, a row of stacked piercings, or, once healed, a small hoop.
The key thing to know is that cartilage needs patience. A helix piercing may look settled after a few weeks, but full healing commonly takes 6 to 12 months. Start with high-quality, low-profile jewelry, clean it with sterile saline no more than twice a day, and avoid pressure from sleeping, over-ear headphones, hair, and hats.
A professional piercer should use a sterile, single-use hollow needle – never a piercing gun. The piercing itself is usually a quick pinch and pressure sensation, while the longer commitment is protecting it during healing.
For many people, the payoff is worth it: helix piercings offer a subtle way to shape a personal ear style without changing the look of the lobe. But the best result comes from choosing a placement that fits your ear anatomy and treating aftercare as part of the decision.
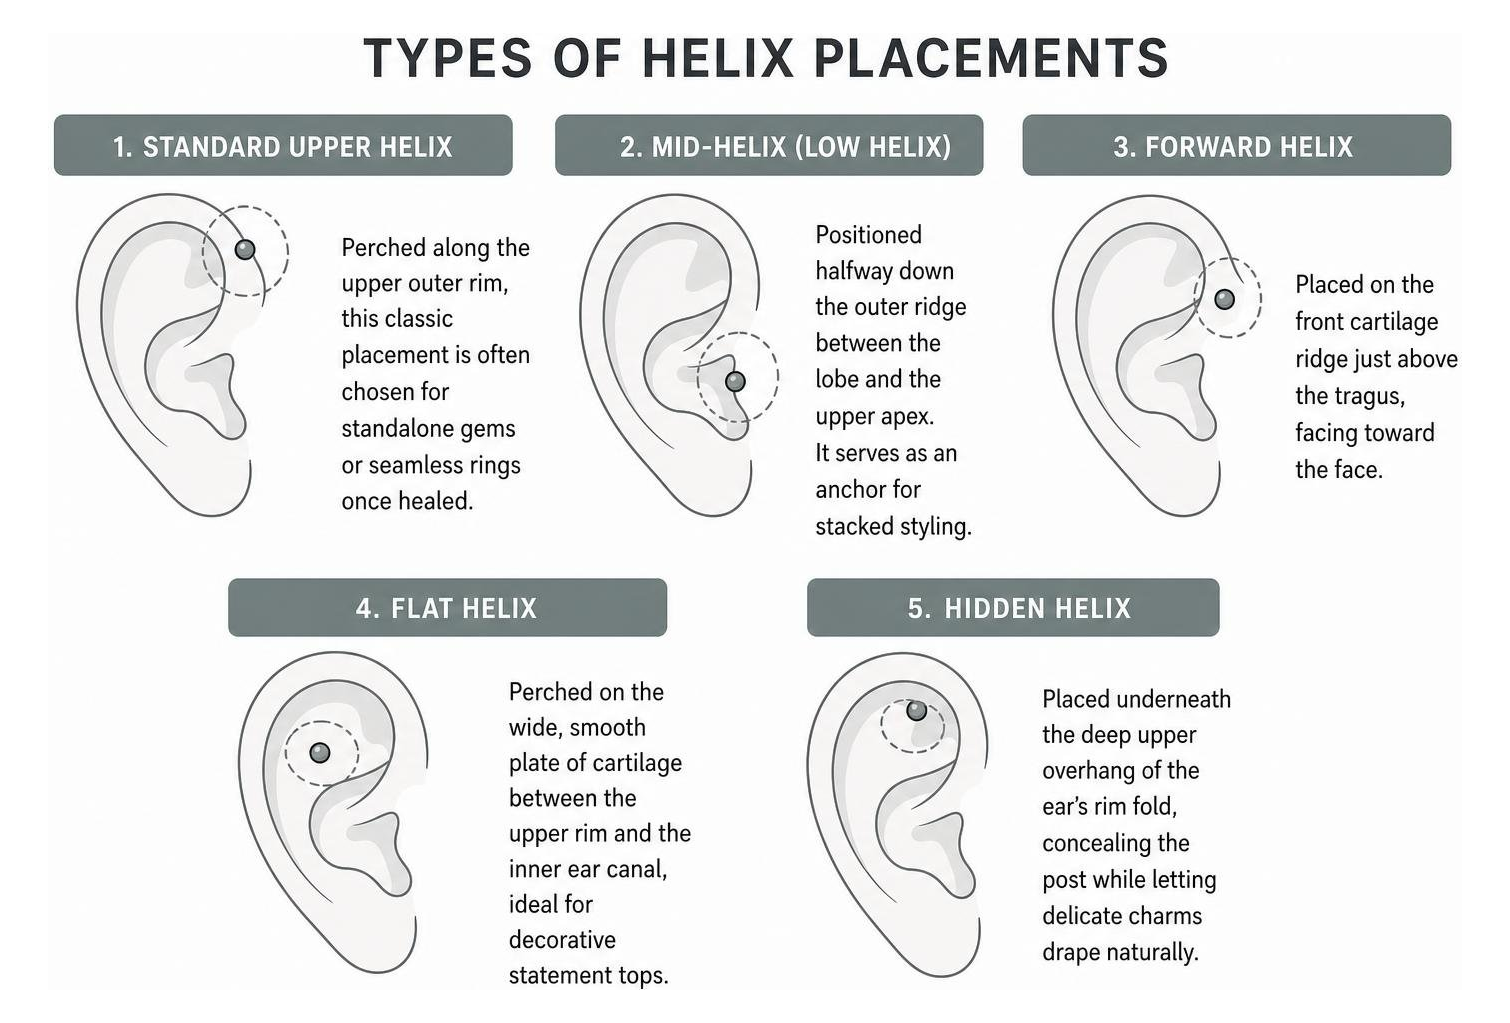
Types and Placements of a Helix Piercing
The outer ear cartilage offers versatile real estate for ear curation. Depending on individual ear anatomy and personal style, there are several distinct positions along the rim and upper cartilage fold:
- Standard Upper Helix: Perched along the upper outer rim, this classic placement is often chosen for standalone gems or seamless rings once healed.
- Mid-Helix (Low Helix): Positioned halfway down the outer ridge between the lobe and the upper apex. It serves as an anchor for stacked styling.
- Forward Helix: Placed on the front cartilage ridge just above the tragus, facing toward the face.
- Flat Helix: Perched on the wide, smooth plate of cartilage between the upper rim and the inner ear canal, ideal for decorative statement tops.
- Hidden Helix: Placed underneath the deep upper overhang of the ear’s rim fold, concealing the post while letting delicate charms drape naturally.
For a deeper look into placement options and curated setups, explore The Ultimate Helix Piercing Guide.
Standard vs. Floating Helix Differences
While a standard helix piercing showcases classic hardware like visible bezels, captive beads, or small hoops, the floating helix is an intentional optical illusion. By utilizing threadless, ultra-low-profile flat-back labrets positioned strategically near or underneath the cartilage fold, the front decorative piece appears to hover weightlessly on the skin without visible mounting posts. Achieving this effect requires precise anatomical assessment and mandatory jewelry downsizing so the post rests completely flush against the tissue.
Multi-Piercing Configurations: Double, Triple, and Industrial
Many piercing enthusiasts expand beyond single placements into stacked curations:
- Double and Triple Helixes: Two or three evenly spaced perforations tracing the outer rim. To ensure comfortable healing, piercers typically recommend managing no more than two to three fresh cartilage piercings simultaneously to prevent overburdening the local immune response.
- Industrial Piercing: A bold architectural variation where a single straight barbell connects two separate helix perforations across the upper ear cartilage.
What to Expect: Procedure, Pain, and Professional Studios
A successful cartilage modification starts in a sterile studio environment. Professional body piercers rely exclusively on sterile, single-use hollow surgical needles. Mechanical piercing guns should never be used on cartilage tissue, as their spring-loaded blunt studs force their way through delicate structures via blunt force trauma, risking severe cartilage shattering, localized necrosis, and extended recovery delays exceeding 12 months.
| Feature | Single-Use Hollow Needle | Mechanical Piercing Gun |
|---|---|---|
| Mechanism | Sharp, bevelled edge slices clean channel | Blunt stud forced via spring tension |
| Tissue Impact | Minimal trauma, clean edges | High blunt force trauma, cartilage micro-fractures |
| Sterilization | Single-use, pre-sterilized medical packaging | Plastic parts cannot be autoclaved |
| Initial Jewelry | Long, flat-back biocompatible posts | Tight butterfly clasps that trap bacteria |
| Average Healing | 6 to 12 months standard | Extended 12+ months with higher bump rates |
Understanding Pain and Sensation During a Helix Piercing
Pain is subjective, but most people rate a needle helix piercing around a 4 out of 10 on the pain scale. Because cartilage is dense and fibrous, you will typically feel a brief, sharp pinch for under one second as the needle passes through, often accompanied by an audible “crunch” sound—which is simply tissue resistance being displaced. Following insertion, the area will generally feel warm and throb moderately for 2 to 4 hours before settling into mild tenderness over the next few days.
Studio Selection and What to Look For in a Professional Piercer
When choosing a studio, verify the following standards:
- Autoclave Sterilization: Working spore-tested autoclaves and individually packaged sterile tools opened in front of you.
- Professional Credentials: Piercers aligned with the Association of Professional Piercers (APP) or verified state licensing.
- Biocompatible Inventory: Starter inventory consisting exclusively of verified implant-grade materials rather than cheap mystery alloys.
- Anatomy Consultations: A reputable practitioner inspects the ear’s curve and thickness before marking placement with a sterile skin pen.
Healing Timeline and Daily Aftercare Protocols
Cartilage is an avascular tissue, meaning it lacks direct capillary blood vessels and relies on nutrient diffusion from surrounding tissue. Because cellular turnover is slower than in soft lobe tissue, following a structured Helix Piercing Guide: Pain, Healing, Jewelry & Aftercare protocol is vital.
The Stages of Cartilage Healing and the False Heal Phase
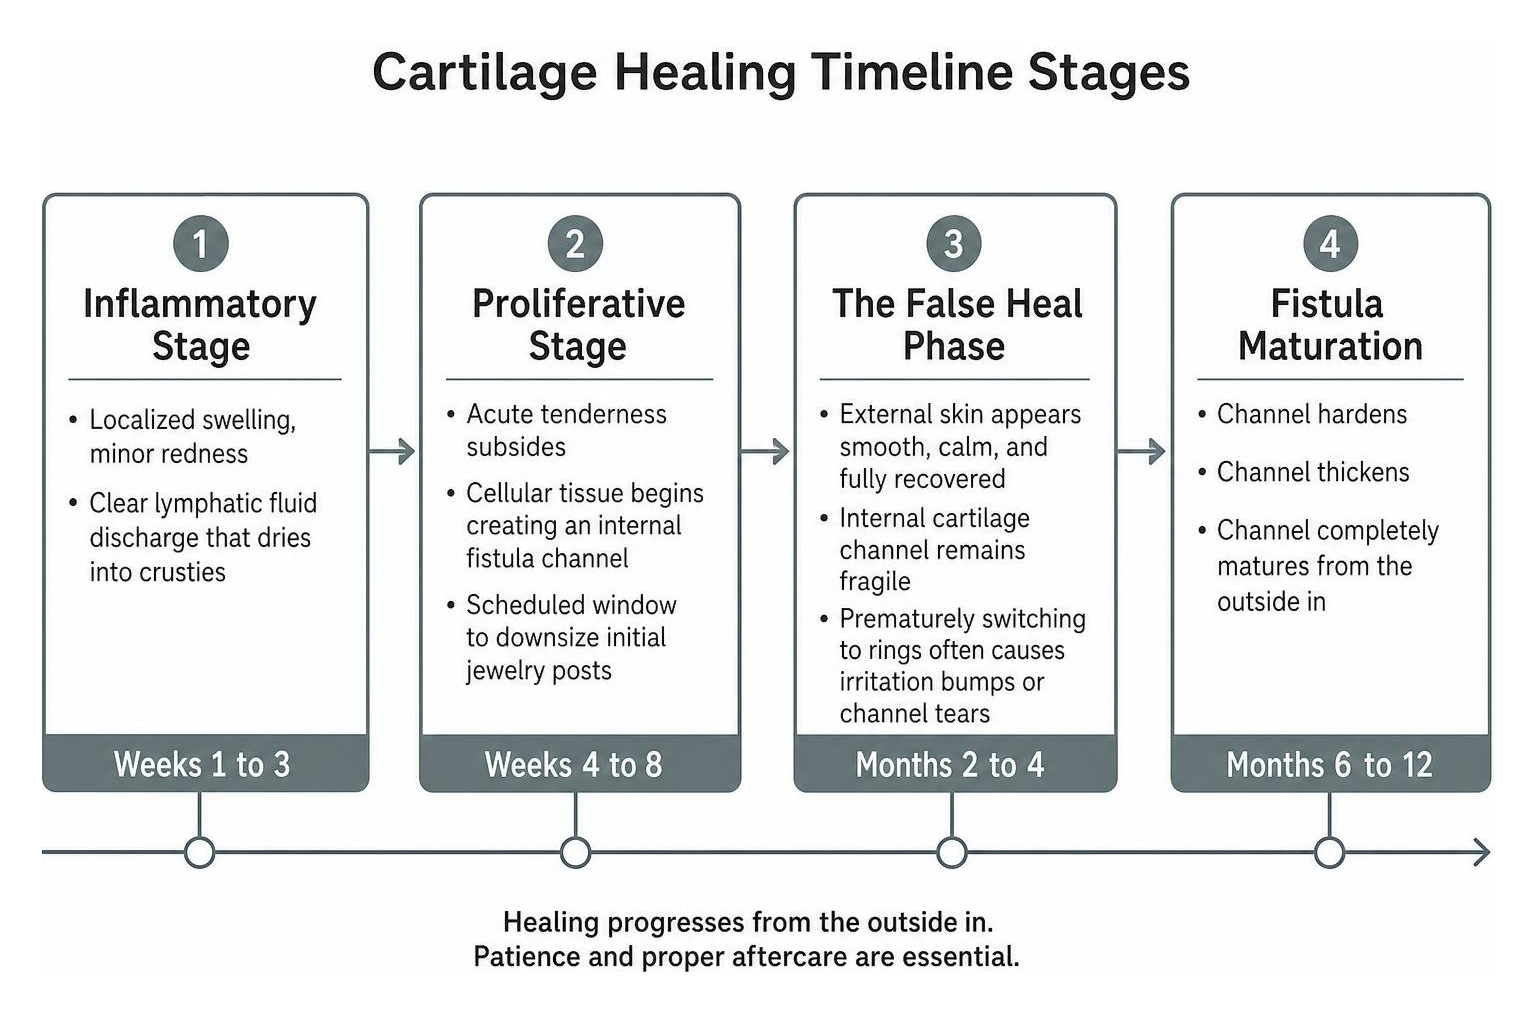
- Inflammatory Stage (Weeks 1 to 3): Localized swelling, minor redness, and clear lymphatic fluid discharge that dries into crusties.
- Proliferative Stage (Weeks 4 to 8): Acute tenderness subsides and cellular tissue begins creating an internal fistula channel. This is the scheduled window to downsize initial jewelry posts.
- The False Heal Phase (Months 2 to 4): The external skin appears smooth, calm, and fully recovered. However, the delicate internal cartilage channel remains fragile. Prematurely switching to rings during this phase often causes immediate irritation bumps or channel tears.
- Fistula Maturation (Months 6 to 12): The channel hardens, thickens, and completely matures from the outside in.
Daily Care Golden Rules: Sleeping, Exercise, and Headphones
To keep your healing on track, observe these daily habits:
- Sleeping Modifications: Direct side-sleeping pressure causes post-tilting, migration, and stubborn friction bumps. Sleep on the opposite side or rest the pierced ear inside the center opening of a donut travel pillow.
- Exercise and Sweat: Rinse away sweat immediately after workouts using sterile saline or a gentle shower rinse. Avoid high-contact sports where the ear might catch impact.
- Headphones and Accessories: Swap over-ear headphones and tight headbands for in-ear earbuds or bone-conduction headphones throughout recovery to prevent pressure and friction.
Helix Piercing Jewelry: Sizing, Materials, and Upgrades
Choosing the correct initial jewelry gauge and metal composition ensures an uncomplicated healing journey. In professional piercing studios, the standard gauge for upper cartilage is 16 gauge (1.2mm), providing structural stability that prevents the “cheese-cutter effect” common in ultra-thin fashion earrings. Some regional studios also utilize 18 gauge (1.0mm) posts.
To understand metal quality and diameter requirements, consult this Helix Piercing Hoop Sizing and Styling Guide.
Best Initial Jewelry for a New Helix Piercing
The gold standard for initial piercing jewelry is a flat-back labret stud (8mm to 10mm post length) that provides sufficient clearance for initial post-procedure swelling.
Safe, biocompatible metal options include:
- ASTM F136 Implant-Grade Titanium: The universal gold standard—lightweight, highly biocompatible, and 100% nickel-free.
- 14K or 18K Solid Gold: High-purity alloyed gold free of nickel, cadmium, and cheap filler alloys. Avoid gold vermeil or electroplated metals during active healing.
- Niobium: A dense, highly hypoallergenic element suitable for individuals with extreme metal sensitivities.
Transitioning from Studs to Hoops and Rings
Wait until your piercer verifies full internal maturation (typically between 6 and 12 months) before switching from a stud to a hoop. Curved posts place uneven mechanical torque on unhealed channels. When transitioning, select smooth clicker rings or seamless hoops made of solid gold or titanium that leave 1mm to 2mm of clearance from the outer rim edge.
Managing Risks, Complications, and Cost Expectations
While most cartilage piercings heal smoothly with proper care, minor complications can occasionally arise. Reviewing the comprehensive Single Helix Piercing Guide can help you troubleshoot common issues early.
Irritation Bumps vs. Infections vs. Keloids
Distinguishing between common localized irritations and genuine medical issues prevents unnecessary stress:
- Irritation Bumps (Granulomas / Hypertrophic Tissue): Soft, flesh-toned or reddish bumps caused by mechanical trauma (sleeping on the ear, snagging, loose long posts, or improper angles). They are not infections and typically resolve over 4 to 8 weeks once the physical trigger is removed and a downsized post is installed.
- Moisture Pustules: Small fluid-filled blisters that form when the area remains wet after cleaning. Keep the tissue dry after showers using non-woven gauze or a cool hair dryer.
- Infections: Characterized by intense throbbing pain, radiating warmth, spreading dark redness, severe swelling, and thick yellow or greenish foul-smelling pus. Infections require immediate evaluation by a healthcare physician for oral antibiotics—do not remove the jewelry prematurely, as the hole can close and trap the infection inside.
- True Keloids: Rare, firm fibrous scar tissue caused by genetic predispositions that continually grows beyond the initial wound boundary. Over 90% of self-diagnosed piercing bumps are simple irritation bumps, not true keloids.
Complete Cost Breakdown and Downsizing Expenses
Budgeting for a professional cartilage piercing involves several distinct elements:
- Piercing Service Fee: $40 to $80 per puncture.
- Initial Starter Jewelry (Implant-Grade Titanium): $30 to $60.
- Fine Jewelry Options (14K Solid Gold / Gemstones): $120 to $300+.
- Aftercare Saline Mist: $10 to $15.
- Jewelry Downsize Appointment (at 6–8 weeks): $20 to $40 for shorter labret posts.
- Total Estimated Year-One Investment: $100 to $250+ depending on jewelry metal preferences.
Frequently Asked Questions about Helix Piercings
Can I sleep on my ear after getting a helix piercing?
Direct side sleeping on a healing helix is strongly discouraged. Continuous downward pressure redirects the piercing channel, causing tilted posts and friction bumps. If you are a dedicated side sleeper, place your ear in the center opening of an elevated travel or donut-style pillow.
When is it safe to change my initial helix jewelry?
You should return to your professional piercer at 6 to 8 weeks strictly to downsize the initial long post to a shorter, flush-fitting post. However, you should wait 6 to 12 months before swapping out the labret stud for hoops, rings, or dangling decorative chains on your own.
How much does a helix piercing cost in 2026?
Most reputable studios charge a total initial fee of $80 to $150 (including the piercing fee and basic implant-grade titanium jewelry). High-end custom gold setups can reach $200 to $350+.
Conclusion
A well-executed helix piercing is a timeless, striking addition to any personal ear curation. While the 6 to 12-month healing timeline requires daily commitment and mindful sleep habits, the long-term payoff is a comfortable, stylish accent that lasts a lifetime.
If you are ready to curate your look with reputable local piercing professionals, fine jewelry artisans, and wellness studios across Upstate New York, explore our comprehensive Capital Region local business directory to find verified local businesses in your community.