Anatomical Types of Ear Piercings and Placements
Every ear possesses a distinct landscape of ridges, valleys, folds, and flesh. Finding the right piercing starts with understanding how these anatomical features are organized. Professional body piercers divide the ear into three primary structural zones: the fleshy lower lobe, the outer cartilage rim, and the dense inner cartilage folds.
Because vascularity and tissue density vary across these zones, your choice of placement directly dictates the healing curve, viable jewelry styles, and pain levels. Exploring earlobe piercing history and anatomy highlights how soft tissue behaves differently compared to rigid cartilage. Let us break down how each zone functions across the ear.
Earlobe Placements: Standard, Stacked, and Transverse
The earlobe serves as the traditional canvas for ear jewelry. Composed of soft adipose and connective tissue without cartilage, it has a rich blood supply that allows for rapid tissue regeneration.
- Standard First Lobe: Located in the center of the lower earlobe. This is the most common piercing worldwide and serves as the baseline for nearly all curated looks.
- Second and Third (Upper) Lobes: Positioned vertically upward along the lobe’s fleshy perimeter toward the start of the cartilage. Spacing between stacked or graduated lobe piercings is generally kept between 6 and 8 millimeters to allow distinct earring silhouettes to sit side by side without crowding.
- Stacked Lobes: Positioned directly above a standard lobe piercing rather than beside it, creating a vertical or clustered two-tier look.
- Constellation Lobes: A customized grouping of three or more micro-studs scattered across broader earlobe real estate, resembling star patterns.
- Transverse Lobe: A specialty procedure where a barbell enters the outer edge of the lobe and exits horizontally through the inner edge, passing through the horizontal plane of the tissue rather than front to back.
Cartilage Ear Piercings: Outer Rim to Inner Fold
Cartilage is a firm, flexible, avascular connective tissue. Because cartilage receives its nutrients through diffusion from the surrounding perichondrium rather than direct capillary blood flow, it requires significantly longer recovery periods than the lobe.
- Helix: Placed anywhere along the curled outer upper cartilage rim. You can opt for a single helix, double helix, or mid-helix.
- Forward Helix: Located on the front curve of the upper ear cartilage, sitting directly above the tragus against the side of the head.
- Hidden (Peekaboo) Helix: Tucked deeply under the upper outer fold of the ear, allowing a dangling charm or gemstone cluster to peek out subtly from underneath the rim.
- Industrial (Scaffold): Two separate piercings along the upper cartilage rim connected by a single straight barbell. This requires specific anatomical ridges to prevent the rigid bar from pressing into the flat of the ear.
- Conch: Situated in the large, cup-shaped center bowl of the ear. A conch can be styled with an internal flat-back stud or a large-diameter hoop wrapping around the outer edge once fully healed.
- Tragus: The small, thick flap of cartilage projecting immediately in front of the ear canal.
- Anti-Tragus: The small ridge of cartilage located directly above the lobe and opposite the tragus.
- Daith: Passes through the innermost cartilage fold right above the ear canal opening. Starter jewelry is almost always a captive bead ring or circular clicker to accommodate the tight contour.
- Rook: Placed vertically through the anti-helix ridge located above the daith and below the upper rim.
- Snug (Anti-Helix): Sits horizontally through the thick inner ridge of cartilage adjacent to the outer rim. It is one of the most anatomically dependent and demanding piercings to heal.
- Orbital: A single ring that passes through two distinct piercing holes located in the same ear section (such as two adjacent lobe or outer helix piercings).
Pain Expectations, Healing Timelines, and Piercing Methods
Pain is subjective, but tissue thickness and the presence of nerve endings create predictable baselines. Softer vascular zones register mild, fleeting sensations, while thicker cartilage involves deeper pressure and localized throbbing during the initial recovery days.
| Piercing Placement | Typical Healing Time | Pain Level (1–10) | Standard Starting Gauge |
|---|---|---|---|
| Standard / Upper Lobe | 6 to 8 weeks | 2 – 3 | 18G – 20G |
| Transverse Lobe | 3 to 6 months | 4 – 5 | 16G |
| Helix / Forward Helix | 6 to 12 months | 4 – 6 | 16G |
| Conch | 6 to 12 months | 5 – 7 | 14G – 16G |
| Tragus / Anti-Tragus | 6 to 12 months | 5 – 7 | 16G |
| Daith | 6 to 12 months | 5 – 7 | 16G |
| Rook | 9 to 18 months | 6 – 8 | 16G |
| Snug | 12 to 18 months | 7 – 9 | 16G |
| Industrial | 9 to 18 months | 7 – 9 | 14G |
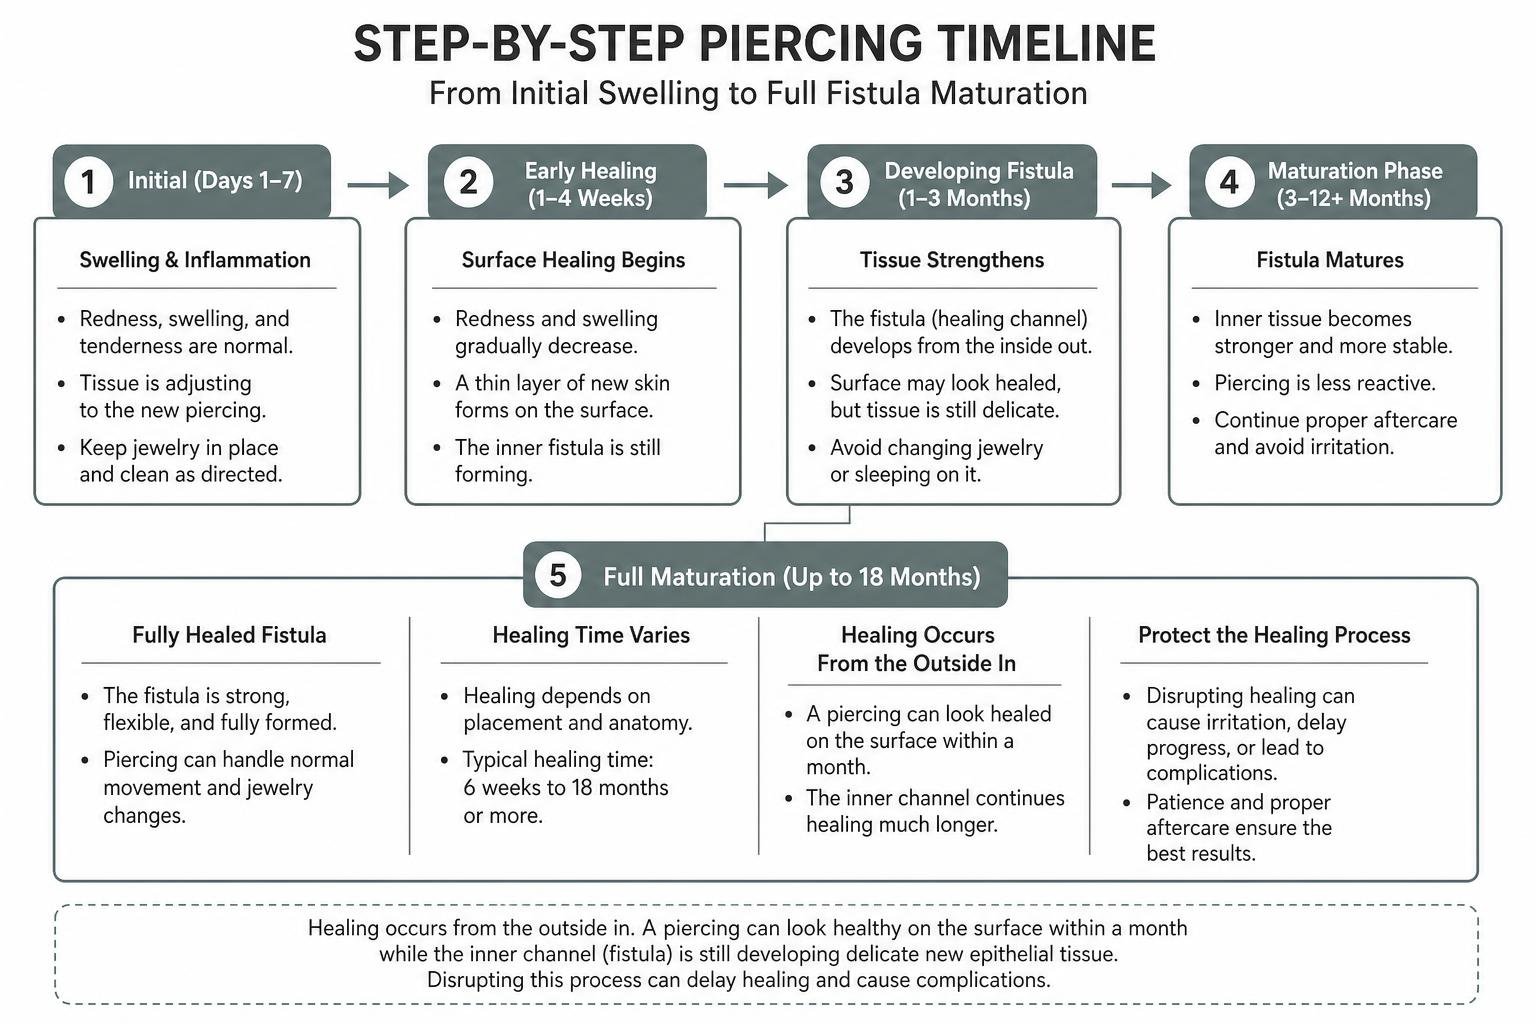
Healing occurs from the outside in. A piercing can look healthy on the surface within a month while the inner channel (fistula) is still developing delicate new epithelial tissue. Disrupting this process can delay healing and cause complications. In fact, research indicates that up to 35% of people with pierced ears experience one or more minor issues, with minor infections making up 77% of reported complications and contact allergies accounting for 43%.
Needle vs. Gun Techniques for Ear Piercings
The tool used to perform your piercing impacts your body’s healing response.
- Hollow-Bore Needles: Professional body piercers use medical-grade, single-use hollow needles that are precision-beveled. The needle creates a clean, intentional crescent incision, removing minimal tissue while creating an open tract for the jewelry post. This causes minimal trauma to surrounding tissue, prevents blunt force damage, and enables faster healing.
- Spring-Loaded Piercing Guns: Commonly found in retail mall kiosks, mechanical piercing guns force a blunt, dull-tipped earring stud directly through the flesh using high-tension spring mechanisms. In cartilage, this blunt force can shatter or split structural tissue, leading to localized trauma, severe swelling, and extended healing times. Furthermore, plastic piercing guns cannot be placed into medical autoclaves for high-heat sterilization, posing unnecessary hygiene risks.
Pediatric Safety and Children’s Ear Piercings
When it comes to children, safety, comfort, and anatomical readiness take top priority. Many parents choose clinical piercing environments, such as pediatric offices or specialized studios staffed by licensed nurses.
For infants and young children, medical professionals typically advise waiting until at least 2 months of age, ensuring the child has received their initial DTaP (diphtheria, tetanus, and acellular pertussis) vaccination. Clinical settings utilize single-use, pre-sterilized, hand-pressurized medical instruments or sterile needles along with hypoallergenic starter studs to minimize the risk of infection. As children grow, ensuring their personal interest, emotional readiness, and active consent ensures they can participate comfortably in their daily aftercare routine.
Earring Jewelry Materials, Sizing, and Closure Systems
The material and engineering of your starter jewelry play a direct role in preventing allergic reactions and supporting healthy healing. Reviewing clinical guidance on piercing safety underscores how proper metal selection prevents complications like contact dermatitis.
Safe Metals for Fresh vs. Healed Piercings
The human immune system reacts quickly to foreign elements placed inside fresh wounds. Selecting biocompatible metals prevents irritation, swelling, and localized rejection.
- Implant-Grade Titanium (ASTM F136): The gold standard for initial piercings. Titanium contains virtually zero nickel, is lightweight, fully biocompatible, and will not tarnish or corrode when exposed to bodily fluids.
- Solid 14k or 18k Gold: Pure gold is too soft for body jewelry, so it is alloyed with other metals. For initial piercings, verify that 14k or 18k gold is completely nickel-free and cadmium-free. Avoid gold-plated, gold-vermeil, or gold-filled jewelry for fresh piercings, as the outer layer can flake or wear away, exposing reactive base metals underneath.
- Implant-Grade Stainless Steel (ASTM F138): A durable option suitable for many individuals, though those with severe nickel sensitivities should opt for titanium instead.
- Niobium: An elemental metal similar to titanium that is completely hypoallergenic and biocompatible.
- Metals to Save for Fully Healed Piercings: Sterling silver (.925) should only be worn in completely mature, healed piercings. When exposed to fresh wound exudate and moisture, silver oxidizes and tarnishes, which can permanently discolor surrounding skin tissue (argyria). Costume metals containing nickel, copper, or zinc should also be avoided.
Post Mechanics and Fasteners
Traditional butterfly-back friction posts are prone to trapping hair, dead skin, dried fluids, and hair products. Modern body piercing favors specialized fasteners that protect tissue during healing:
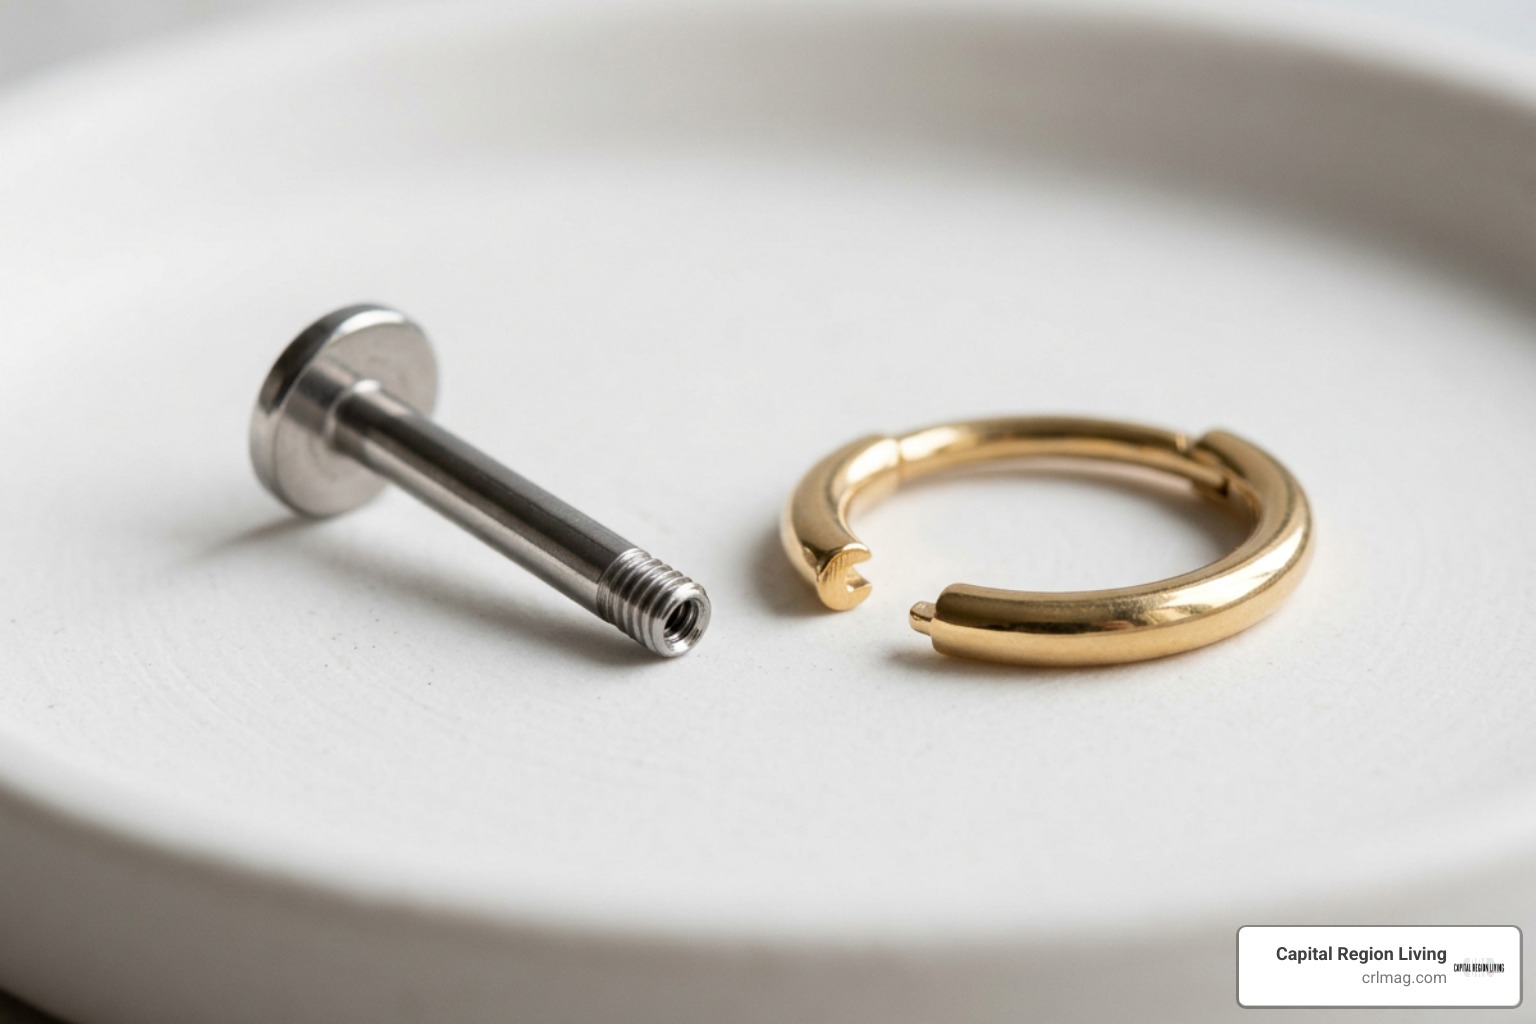
- Flat-Back Labrets (Internally Threaded): The smooth post features a flat disk on the back that rests flush against the skin. The decorative front end features an attached threaded screw that inserts directly inside the post channel. Because the post exterior is completely smooth, it will not tear or scratch delicate tissue during insertion.
- Threadless (Push-Pin) Studs: The flat-back post is hollow. The decorative front end has a small, slightly bent pin that inserts into the shaft. Tension secures the top firmly in place, allowing for easy, tool-free jewelry changes once healed.
- Clicker Rings: Featuring a hinged segment that opens and snaps securely into place with an audible “click.” These provide a seamless, smooth ring exterior without sharp edges, making them ideal for healed daith, conch, and septum placements.
- Downsizing Posts: Professional piercers intentionally insert longer labret posts (typically 8mm) during your initial appointment to accommodate initial inflammatory swelling. Once the tissue calms down (usually 4 to 8 weeks post-piercing), you must return to your piercer for a shorter replacement post (often 5.5mm to 6.5mm). Leaving long posts in place permanently leads to snagging, irritation bumps, and jewelry shifting at crooked angles.
Aftercare Routines, Ear Curation, and Infection Prevention
Proper aftercare relies on gentle, consistent cleaning while letting your body’s natural immune processes rebuild healthy tissue. Following dermatological wound care recommendations helps protect the fragile healing fistula.
- Clean with Sterile Saline Twice Daily: Spray the entry and exit points with sterile 0.9% sodium chloride wound wash. Gently pat the surrounding area dry with a clean, disposable paper towel or non-woven gauze pad.
- Hands Off: Wash your hands thoroughly with soap and water before handling your ears. Never twist, spin, rotate, or pick at healing jewelry. Rotating earrings disrupts delicate tissue formation and reopens the healing channel.
- Avoid Harsh Chemicals: Do not use rubbing alcohol, hydrogen peroxide, antibacterial soaps, witch hazel, Bactine, or tea tree oil. These substances dry out healthy cells, irritate tissue, and delay healing.
- Keep Pressure Off When Sleeping: Sleeping directly on a healing ear forces jewelry against cartilage at unnatural angles. Use a donut-shaped travel pillow, resting your ear directly inside the opening to relieve overnight pressure.
- Avoid Standing Water: Stay out of hot tubs, swimming pools, lakes, and unsterilized bathtubs until your piercing has fully healed, as public water harbors bacteria.
Styling a Curated Ear
Ear curation is the process of styling an intentional, personalized ear layout tailored to your unique anatomical folds. Instead of filling every available space, a balanced setup uses proportions, textures, and empty space to create a cohesive look.
- The 3:2 Asymmetry Rule: Instead of mirroring identical piercings across both ears, aim for balanced asymmetry. For instance, style three piercings on your left ear (such as a triple-lobe stack) and two on your right (such as a first lobe paired with a conch hoop).
- Graduated Sizing: Arrange your jewelry by scale, placing larger gemstones or heavier hoops on the lower lobe and transitioning to progressively smaller studs, delicate huggies, or micro-gems as you move up the cartilage.
- Embrace Negative Space: Leaving untouched space between piercings highlights individual jewelry pieces and keeps your ear stack looking balanced rather than overcrowded.
Infection Signs vs. Irritation Bumps
Minor redness, light localized swelling, and clear-to-pale-yellow lymph fluid that dries into small crusts are normal parts of the inflammatory healing phase. However, it is essential to distinguish between a simple irritation bump and a true medical infection.
- Irritation Bumps (Hypertrophic Scarring / Granulomas): Small, localized, flesh-colored or reddish raised bumps next to the piercing hole. These are almost always caused by physical trauma: sleeping on the piercing, jewelry snagging on clothing, friction from un-downsized posts, or harsh cleaning products. Correcting the underlying issue (downsizing the post or using a donut pillow) allows the bump to gradually subside.
- True Bacterial Infections: Marked by spreading, intense redness, severe localized heat, persistent throbbing pain, significant swelling, and thick, opaque green or dark yellow pus accompanied by a foul odor. If an infection develops, consult a healthcare professional for evaluation. Do not remove the jewelry, as the earring post keeps the channel open to drain; removing it can trap bacteria underneath closed skin, potentially causing an abscess.
Frequently Asked Questions About Ear Piercings
Does a daith piercing help relieve migraine headaches?
While some individuals report fewer migraine headaches after receiving a daith piercing, there is no clinical scientific evidence proving it works as a medical treatment. The idea stems from acupuncture concepts, where the daith area loosely corresponds to a pressure point linked to headache relief. Major medical organizations, including the American Migraine Foundation, attribute reported relief to the placebo effect. You should approach a daith piercing as a decorative aesthetic choice rather than a medical remedy.
When is it safe to change initial piercing jewelry?
You should keep your starter jewelry in place for the full duration of your healing timeline: at least 6 to 8 weeks for standard earlobes and 6 to 12 months for cartilage. Jewelry should only be swapped when the piercing is completely free of redness, crusting, tenderness, and swelling. The single exception is a professional downsize adjustment performed by your piercer to shorten the post once initial swelling subsides.
Can you sleep on a fresh cartilage piercing?
You should avoid sleeping directly on a healing cartilage piercing. Sustained pressure cuts off localized blood circulation, irritates surrounding tissue, and can permanently push the piercing channel into a crooked angle (migration). If you are a side sleeper, use a circular travel pillow or donut pillow, placing your ear comfortably in the center hole to keep direct pressure off the jewelry.
Conclusion
Planning your ear piercings is an exciting journey of personal style and creative expression. Whether you are starting with your very first set of classic lobe studs or curating a balanced cartilage stack, taking the time to understand your ear’s unique anatomy, respecting biological healing timelines, and maintaining consistent aftercare will ensure your piercings stay healthy and comfortable for years to come.
When you are ready to take your next step, turn to experienced, licensed body art professionals who prioritize single-use needles, medical-grade sterilization, and biocompatible jewelry. If you are looking for trusted local studios and top-rated wellness specialists across our community, browse through the comprehensive Capital Region business directory to find reputable regional providers near you.